ShopDreamUp AI ArtDreamUp
Deviation Actions


Suggested Deviants


Suggested Collections


You Might Like…


![Pokemon Shinx Plush [Free Pattern and Tutorial]](https://images-wixmp-ed30a86b8c4ca887773594c2.wixmp.com/f/5e484897-b48a-473d-835e-f0cb4ec67cd4/denlrue-630a1524-a580-4444-9cb7-8442a51553d5.png/v1/crop/w_184,h_184,x_0,y_0,scl_0.078902229845626,q_70,strp/pokemon_shinx_plush__free_pattern_and_tutorial__by_maveeluv_denlrue-92s-2x.jpg?token=eyJ0eXAiOiJKV1QiLCJhbGciOiJIUzI1NiJ9.eyJzdWIiOiJ1cm46YXBwOjdlMGQxODg5ODIyNjQzNzNhNWYwZDQxNWVhMGQyNmUwIiwiaXNzIjoidXJuOmFwcDo3ZTBkMTg4OTgyMjY0MzczYTVmMGQ0MTVlYTBkMjZlMCIsIm9iaiI6W1t7ImhlaWdodCI6Ijw9MTI4MCIsInBhdGgiOiJcL2ZcLzVlNDg0ODk3LWI0OGEtNDczZC04MzVlLWYwY2I0ZWM2N2NkNFwvZGVubHJ1ZS02MzBhMTUyNC1hNTgwLTQ0NDQtOWNiNy04NDQyYTUxNTUzZDUucG5nIiwid2lkdGgiOiI8PTEyODAifV1dLCJhdWQiOlsidXJuOnNlcnZpY2U6aW1hZ2Uub3BlcmF0aW9ucyJdfQ.Q-PpsnueVmj1gqVxfwuqCws_utqeQpn0WQ-H6x4_qAw)
![Pokemon Shinx Plush [Free Pattern and Tutorial]](https://images-wixmp-ed30a86b8c4ca887773594c2.wixmp.com/f/5e484897-b48a-473d-835e-f0cb4ec67cd4/denlrue-630a1524-a580-4444-9cb7-8442a51553d5.png/v1/crop/w_92,h_92,x_0,y_0,scl_0.039451114922813,q_70,strp/pokemon_shinx_plush__free_pattern_and_tutorial__by_maveeluv_denlrue-92s.jpg?token=eyJ0eXAiOiJKV1QiLCJhbGciOiJIUzI1NiJ9.eyJzdWIiOiJ1cm46YXBwOjdlMGQxODg5ODIyNjQzNzNhNWYwZDQxNWVhMGQyNmUwIiwiaXNzIjoidXJuOmFwcDo3ZTBkMTg4OTgyMjY0MzczYTVmMGQ0MTVlYTBkMjZlMCIsIm9iaiI6W1t7ImhlaWdodCI6Ijw9MTI4MCIsInBhdGgiOiJcL2ZcLzVlNDg0ODk3LWI0OGEtNDczZC04MzVlLWYwY2I0ZWM2N2NkNFwvZGVubHJ1ZS02MzBhMTUyNC1hNTgwLTQ0NDQtOWNiNy04NDQyYTUxNTUzZDUucG5nIiwid2lkdGgiOiI8PTEyODAifV1dLCJhdWQiOlsidXJuOnNlcnZpY2U6aW1hZ2Uub3BlcmF0aW9ucyJdfQ.Q-PpsnueVmj1gqVxfwuqCws_utqeQpn0WQ-H6x4_qAw)


Description
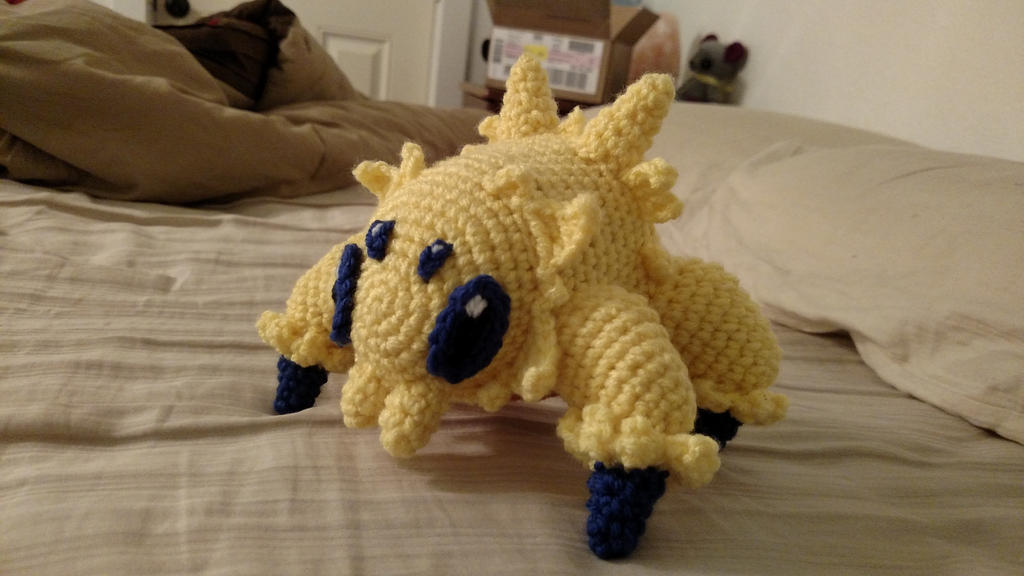
For other views for you to reference: fav.me/d9t4jkk
Protip: when leaving a tail long enough to sew something, measure the area you need to sew around(say the circumference of a leg), then multiply that by 3. This generally leaves the perfect amount of yarn or thread to work with (this applies to sewing and crocheting.)
I used an F hook and regular redheart worsted weight yarn.
Body(yellow)
1.) Magic ring with 6 sts. (6)
2.) 2 sc in each (12)
3.) sc then 2 sc in next (18)
4.) 2 sc then 2sc in next (24)
5.) 12 sc then *2 sc in next then 2 sc* repeat from * to * until end (28)
6.) 12 sc then *2 sc in next then 3 sc* repeat from * to * until end (32)
7.) 12 sc then *2 sc in next then 4 sc* repeat from * to * until end (36)
8.) 1 sc in each
9.) In BLO 1 sc in each
10.) 12 sc then *2 sc in next then 5 sc* repeat from * to * until end (40)
11.) 1 sc in each
12.) 1 sc in each
13.) 1 sc in each
14.) 12 sc then *2 sc in next then 6 sc* repeat from * to * until end (44)
15.) 1 sc in each
16.) 1 sc in each
17.) 1 sc in each
18.) 12 sc then *2 sc in next then 7 sc* repeat from * to * until end (48)
Start stuffing body. Continue to stuff as needed as we begin to close to body.
19.) In BLO 1 sc in each
20.) 6 sc then 2tog (42)
21.) 5 sc then 2tog (36)
22.) 4 sc then 2tog (30)
23.) 3 sc then 2tog (24)
24.) 2 sc then 2tog (18)
25.) 1 sc then 2tog (12)
26.) 6 2tog's (6)
Fasten off with multiple inches of tail. Use yarn needle to gather the loops and 6 sts in a circle and pull tight to close.
Legs right side (make 2, in yellow)
Rows 6, 7 and 9 all haves increases and decreases, but the ending stitch count does not change. This makes the leg curve instead of being straight. (Smile)")
1.) Magic ring with 4 sts (4)
2.) 2 sc in each (8)
3.) 1 sc then 2 sc in next (12)
4.) 2sc then 2 sc in next (16)
5.) 1 sc in each
6.) 2 tog x 2, 5 sc, 2sc in next x 2 , 5 sc (16)
7.) 1 tog, 6sc then 2 sc in next, 7 sc (16)
8.) 1 sc in each
9.) 2 sc in next, 7 sc, 2tog, 6 sc(16)
10.) 1 sc in each
Put stitch markers in these legs when done to differentiate them from the left ones
Legs left side (make 2 in yellow)
1.) Magic ring with 4 sts (4)
2.) 2 sc in each (8)
3.) 1 sc then 2 sc in next (12)
4.) 2sc then 2 sc in next (16)
5.) 1 sc in each
6.) 2 tog x 2, 5 sc, 2sc in next x 2 , 5 sc (16)
7.) 1 tog, 7sc then 2 sc in next, 6 sc (16)
8.) 1 sc in each
9.) 2 sc in next, 6 sc, 2tog, 7 sc(16)
10.) 1 sc in each
Stuff legs
Legs should be parallel with each other. Refer to picture for placement.
Claws (make 4 in blue)
1.) Magic ring with 3 sc (3)
2.) 2 sc in next then 2 sc (4)
3.) 2 sc in next then sc in rest (5)
4.) 2 sc in next then sc in next 4, then 2 sc in next (7)
5.) 2 sc in next then sc in rest (8) Fasten off.
6.) With yellow, 1 sc in each. Do not finish off.
These are probably too small to stuff, but if you can fit stuffing in yours, feel free
Claw fluffs
Turn your work so the point of the claw is facing away from you.
We will be doing something like a picot point stitch
In BLO *ch 3, then sc in second chain from hook. hdc in last loop of the ch 3. sl st in next sc.* Repeat from * to * all the way around. You should end up with 8 triangle points. sl st in bottom of your first triangle then fasten off. Leave a long enough tail to attach the claws to the legs.
Use the unworked loops of the claw fluff to attach to legs. One side of claw fluff gets attached to row two of leg. Refer to picture.
Big Tail spikes
Make two in yellow
1.) Magic ring with 3 sts (3)
2.) 2sc in next then sc in rest (4)
3.) 2 sc in next then sc in rest (5)
4.) : 2 sc in next then 1 sc in next 4, then 2 sc in next (7)
5.) 2 sc in next, then sc in rest (8)
6.) 2 sc in next, then sc in rest (9)
Stuff tail spikes
Big tail spikes get attached to the top and middle of the butt with two loops in between them.
Mouth
1.) Magic ring with 4 sts (4)
2.) 2 sc in next then sc in rest (5)
3.) 2 sc in next, then sc in rest (6)
4.) 2 sc in next, then sc in rest (7)
Stuff mouth pieces
The mouth pieces get attached at the bottom of row 6. Make sure they are in the middle.
Head spikes.
Your BLO rows come in handy here. We are using a triangle or picot point like stitch to make our head fluffs.
Leave top middle five loops unworked. With face towards you, attach yarn to left side of the five loops. We will go all the way around this row without fastening off to make each triangle
1st small triangle: ch 3, sc in second loop from hook, hdc in last of the ch 3 loops, sl st in next stitch
1st big triangle: ch 6. sc in second loop from hook., 1 hdc in next, 1 dc in next, 1 tr in next, 1 tr in last of ch 6 loops., sl st in 4th loop away
2nd small triangle: ch 2, sc in second loop from hook, sl st in next stitch
2nd big triangle: ch 6. sc in second loop from hook, 1 hdc in next, 1 dc in next, 1 tr in next, 1 tr in last of ch 6 loops, sl st in 4th loop away
3rd small triangle: ch 3, 1 sc in second loop from hook, 1 hdc in last of ch 3 loops, sl in next stitch
Space under chin, NO TRIANGLES HERE : sl st in next 8 sts
4th small triangle: ch 3, 1 sc in second loop from hook, 1 hdc in last of ch 3 loops, sl in next stitch
3rd big triangle: ch 6. sc in second loop from hook, 1 hdc in next, 1 dc in next, 1 tr in next, 1 tr in last of ch 6 loops, sl st in 4th loop away
5th small triangle: ch 2, sc in second loop from hook, sl st in next stitch
4th big triangle: ch 6. sc in second loop from hook, 1 hdc in next, 1 dc in next, 1 tr in next, 1 tr in last of ch 6 loops, sl st in 4th loop away
6th small triangle: ch 3, 1 sc in second loop from hook, 1 hdc in last of ch 3 loops, sl in next stitch
Butt spikes
These will be done is separate chunks
Keep the face facing towards you as you work.
From left side, attach yarn right next to the tail
1st triangle: ch 4 sc in second loop from hook, 1 hdc in next, 1 dc in last loop of ch 4, sl st into next stitch
2nd triangle: ch 3 sc in second loop from hook, 1 hdc in last loop of ch 3 sl st into next stitch
Fasten off.
Attach yarn to third loop away from previous triangle
3rd triangle: ch 3 sc in second loop from hook, 1 hdc in last loop of ch 3
Your leg should be just below this traingle.
From right side, attach yarn to the third loop away from the tail spikes.
4th Triangle: ch 3 sc in second loop from hook, 1 hdc in last loop of ch 3 sl st into next stitch
5th Triangle: ch 4 sc in second loop from hook, 1 hdc in next, 1 dc in last loop of ch 4, sl st into next stitch
Fasten off.
Attach yarn to fourth loop away from previous triangle
6th triangle: ch 3 sc in second loop from hook, 1 hdc in last loop of ch 3
Your leg should be just below this traingle.
Eyes(large)
Make two.
ch 5
1.) sc in next 3, 3 sc in next, sc in next 3, 2 sc in next, sl st and fasten off
Use black and white yarn to embroider pupils and eye shine.
Eyes(small)
Make two.
ch 3, fasten off. Leave long tail on both ends.
Use white yarn or embroidery thread to add eye shine.
Look to picture for placement of eyes. Use hot glue or sew the big eyes to head. Insert the long tails of small eyes into plush, allowing the tail to come out somewhere else in plush(from the same place) tie knot a few times, then hide knot in plush.
Tummy patch
1.) Magic ring with 6 sts (6)
2.) 2 sc in each (12)
3.) 1 sc then 2 sc in next (18)
4,) 2 sc then 2 sc in next (24)
5.) 3 sc then 2 sc in next (30)
6.) 4 sc then 2 sc in next (36)
Belly patch gets sewn onto bottom of plush. Should be two row behind your BLO row of head.
Protip: when leaving a tail long enough to sew something, measure the area you need to sew around(say the circumference of a leg), then multiply that by 3. This generally leaves the perfect amount of yarn or thread to work with (this applies to sewing and crocheting.)
I used an F hook and regular redheart worsted weight yarn.
Body(yellow)
1.) Magic ring with 6 sts. (6)
2.) 2 sc in each (12)
3.) sc then 2 sc in next (18)
4.) 2 sc then 2sc in next (24)
5.) 12 sc then *2 sc in next then 2 sc* repeat from * to * until end (28)
6.) 12 sc then *2 sc in next then 3 sc* repeat from * to * until end (32)
7.) 12 sc then *2 sc in next then 4 sc* repeat from * to * until end (36)
8.) 1 sc in each
9.) In BLO 1 sc in each
10.) 12 sc then *2 sc in next then 5 sc* repeat from * to * until end (40)
11.) 1 sc in each
12.) 1 sc in each
13.) 1 sc in each
14.) 12 sc then *2 sc in next then 6 sc* repeat from * to * until end (44)
15.) 1 sc in each
16.) 1 sc in each
17.) 1 sc in each
18.) 12 sc then *2 sc in next then 7 sc* repeat from * to * until end (48)
Start stuffing body. Continue to stuff as needed as we begin to close to body.
19.) In BLO 1 sc in each
20.) 6 sc then 2tog (42)
21.) 5 sc then 2tog (36)
22.) 4 sc then 2tog (30)
23.) 3 sc then 2tog (24)
24.) 2 sc then 2tog (18)
25.) 1 sc then 2tog (12)
26.) 6 2tog's (6)
Fasten off with multiple inches of tail. Use yarn needle to gather the loops and 6 sts in a circle and pull tight to close.
Legs right side (make 2, in yellow)
Rows 6, 7 and 9 all haves increases and decreases, but the ending stitch count does not change. This makes the leg curve instead of being straight.
1.) Magic ring with 4 sts (4)
2.) 2 sc in each (8)
3.) 1 sc then 2 sc in next (12)
4.) 2sc then 2 sc in next (16)
5.) 1 sc in each
6.) 2 tog x 2, 5 sc, 2sc in next x 2 , 5 sc (16)
7.) 1 tog, 6sc then 2 sc in next, 7 sc (16)
8.) 1 sc in each
9.) 2 sc in next, 7 sc, 2tog, 6 sc(16)
10.) 1 sc in each
Put stitch markers in these legs when done to differentiate them from the left ones
Legs left side (make 2 in yellow)
1.) Magic ring with 4 sts (4)
2.) 2 sc in each (8)
3.) 1 sc then 2 sc in next (12)
4.) 2sc then 2 sc in next (16)
5.) 1 sc in each
6.) 2 tog x 2, 5 sc, 2sc in next x 2 , 5 sc (16)
7.) 1 tog, 7sc then 2 sc in next, 6 sc (16)
8.) 1 sc in each
9.) 2 sc in next, 6 sc, 2tog, 7 sc(16)
10.) 1 sc in each
Stuff legs
Legs should be parallel with each other. Refer to picture for placement.
Claws (make 4 in blue)
1.) Magic ring with 3 sc (3)
2.) 2 sc in next then 2 sc (4)
3.) 2 sc in next then sc in rest (5)
4.) 2 sc in next then sc in next 4, then 2 sc in next (7)
5.) 2 sc in next then sc in rest (8) Fasten off.
6.) With yellow, 1 sc in each. Do not finish off.
These are probably too small to stuff, but if you can fit stuffing in yours, feel free
Claw fluffs
Turn your work so the point of the claw is facing away from you.
We will be doing something like a picot point stitch
In BLO *ch 3, then sc in second chain from hook. hdc in last loop of the ch 3. sl st in next sc.* Repeat from * to * all the way around. You should end up with 8 triangle points. sl st in bottom of your first triangle then fasten off. Leave a long enough tail to attach the claws to the legs.
Use the unworked loops of the claw fluff to attach to legs. One side of claw fluff gets attached to row two of leg. Refer to picture.
Big Tail spikes
Make two in yellow
1.) Magic ring with 3 sts (3)
2.) 2sc in next then sc in rest (4)
3.) 2 sc in next then sc in rest (5)
4.) : 2 sc in next then 1 sc in next 4, then 2 sc in next (7)
5.) 2 sc in next, then sc in rest (8)
6.) 2 sc in next, then sc in rest (9)
Stuff tail spikes
Big tail spikes get attached to the top and middle of the butt with two loops in between them.
Mouth
1.) Magic ring with 4 sts (4)
2.) 2 sc in next then sc in rest (5)
3.) 2 sc in next, then sc in rest (6)
4.) 2 sc in next, then sc in rest (7)
Stuff mouth pieces
The mouth pieces get attached at the bottom of row 6. Make sure they are in the middle.
Head spikes.
Your BLO rows come in handy here. We are using a triangle or picot point like stitch to make our head fluffs.
Leave top middle five loops unworked. With face towards you, attach yarn to left side of the five loops. We will go all the way around this row without fastening off to make each triangle
1st small triangle: ch 3, sc in second loop from hook, hdc in last of the ch 3 loops, sl st in next stitch
1st big triangle: ch 6. sc in second loop from hook., 1 hdc in next, 1 dc in next, 1 tr in next, 1 tr in last of ch 6 loops., sl st in 4th loop away
2nd small triangle: ch 2, sc in second loop from hook, sl st in next stitch
2nd big triangle: ch 6. sc in second loop from hook, 1 hdc in next, 1 dc in next, 1 tr in next, 1 tr in last of ch 6 loops, sl st in 4th loop away
3rd small triangle: ch 3, 1 sc in second loop from hook, 1 hdc in last of ch 3 loops, sl in next stitch
Space under chin, NO TRIANGLES HERE : sl st in next 8 sts
4th small triangle: ch 3, 1 sc in second loop from hook, 1 hdc in last of ch 3 loops, sl in next stitch
3rd big triangle: ch 6. sc in second loop from hook, 1 hdc in next, 1 dc in next, 1 tr in next, 1 tr in last of ch 6 loops, sl st in 4th loop away
5th small triangle: ch 2, sc in second loop from hook, sl st in next stitch
4th big triangle: ch 6. sc in second loop from hook, 1 hdc in next, 1 dc in next, 1 tr in next, 1 tr in last of ch 6 loops, sl st in 4th loop away
6th small triangle: ch 3, 1 sc in second loop from hook, 1 hdc in last of ch 3 loops, sl in next stitch
Butt spikes
These will be done is separate chunks
Keep the face facing towards you as you work.
From left side, attach yarn right next to the tail
1st triangle: ch 4 sc in second loop from hook, 1 hdc in next, 1 dc in last loop of ch 4, sl st into next stitch
2nd triangle: ch 3 sc in second loop from hook, 1 hdc in last loop of ch 3 sl st into next stitch
Fasten off.
Attach yarn to third loop away from previous triangle
3rd triangle: ch 3 sc in second loop from hook, 1 hdc in last loop of ch 3
Your leg should be just below this traingle.
From right side, attach yarn to the third loop away from the tail spikes.
4th Triangle: ch 3 sc in second loop from hook, 1 hdc in last loop of ch 3 sl st into next stitch
5th Triangle: ch 4 sc in second loop from hook, 1 hdc in next, 1 dc in last loop of ch 4, sl st into next stitch
Fasten off.
Attach yarn to fourth loop away from previous triangle
6th triangle: ch 3 sc in second loop from hook, 1 hdc in last loop of ch 3
Your leg should be just below this traingle.
Eyes(large)
Make two.
ch 5
1.) sc in next 3, 3 sc in next, sc in next 3, 2 sc in next, sl st and fasten off
Use black and white yarn to embroider pupils and eye shine.
Eyes(small)
Make two.
ch 3, fasten off. Leave long tail on both ends.
Use white yarn or embroidery thread to add eye shine.
Look to picture for placement of eyes. Use hot glue or sew the big eyes to head. Insert the long tails of small eyes into plush, allowing the tail to come out somewhere else in plush(from the same place) tie knot a few times, then hide knot in plush.
Tummy patch
1.) Magic ring with 6 sts (6)
2.) 2 sc in each (12)
3.) 1 sc then 2 sc in next (18)
4,) 2 sc then 2 sc in next (24)
5.) 3 sc then 2 sc in next (30)
6.) 4 sc then 2 sc in next (36)
Belly patch gets sewn onto bottom of plush. Should be two row behind your BLO row of head.
Image size
5248x2952px 4.07 MB
Make
Motorola
Model
XT1254
Shutter Speed
1/20 second
Aperture
F/2.0
Focal Length
5 mm
ISO Speed
500
Date Taken
Feb 25, 2016, 10:00:44 PM
© 2016 - 2024 ListenMagician
Comments5
Join the community to add your comment. Already a deviant? Log In
sO CUTE
AHHHHH
I gotta do this sometime omg thanks
AHHHHH
I gotta do this sometime omg thanks